Table of Contents
Constructing a Hobby Animal
Mainly for Morris Dancers.
by
Ron Shuttleworth
Archivist, Folk Play Section, Morris Ring Archive
Ex-Keeper of Beasts to the Illustrious Order of United Fools
Author of
So You Want to Start Mumming
Introducing the Folk Plays of England
PREFACE
This study started as the text of a talk which I gave in 1985 at the Morris Ring’s Weekend Instructional for Fools and Beasts. It was very hurriedly composed and typed, but copies circulated for several years – errors and all. Encouragement to correct and update it only bore fruit in 1994, but my natural procrastination has had the useful result of allowing me to meet Phil Underwood, the then Ring ‘Recorder of Beasts’ from whom I learnt much including a reduced belief in my own infallibility.
Needing to reprint, I take the opportunity to include some recent developments. In this booklet I have tried to identify areas where decisions need to be taken or where problems may occur, and to suggest possible solutions and lines of action. I must stress strongly that this is not meant to be definitive. One thing which has come over very clearly in previous years is that creative beast -makers are constantly producing new ideas. I can therefore only try to lay out a ground plan hoping that this will enable people to devote a greater proportion of their energy to producing better and more imaginative creatures. Here and there I have made assertions as to what is ‘good’ or ‘bad’. These are generalisations only, and you may have the talent to prove them wrong. For example, I state that ‘mast’ mountings are better than hat mountings, and that a moving jaw is essential for expression. It is also held that animals do not have arms. Ripley Morris Men’s unicorn which matches the inspired interpretation of the builder to the modeller’s skill, has ignored all these recommendations with triumphant success.
Even though some of this may not apply to your situation I do urge you to read it all, as advice given under one heading -mast, tourney, etca, -may apply to others also. At the end, you may decide that you are going to do something entirely different -This is fine, because you will be working from a basis of careful thought and conscious decision and the result is therefore likely to reflect credit on all concerned .
I dedicate this to all those innovative and creative Beast-Makers who so kindly shared their ideas with me, and whose input has so advanced the understanding of our craft. R.K.S.
DEFINITIONS.
In the past everyone could have given his own, probably different, meanings to such terms as ‘Hooden Horse’ or ‘Hobby Horse’. Certain books however, have now laid down a nomenclature which we may accept as definitive. In the following such terms are written in capitals, I have expanded on some of these to attempt a terminology explicit enough to differentiate all variations which could he included in the present study.
HOBBY ANIMAL/BEAST. Any mock creature which has a human operator incorporated in it or included with it.
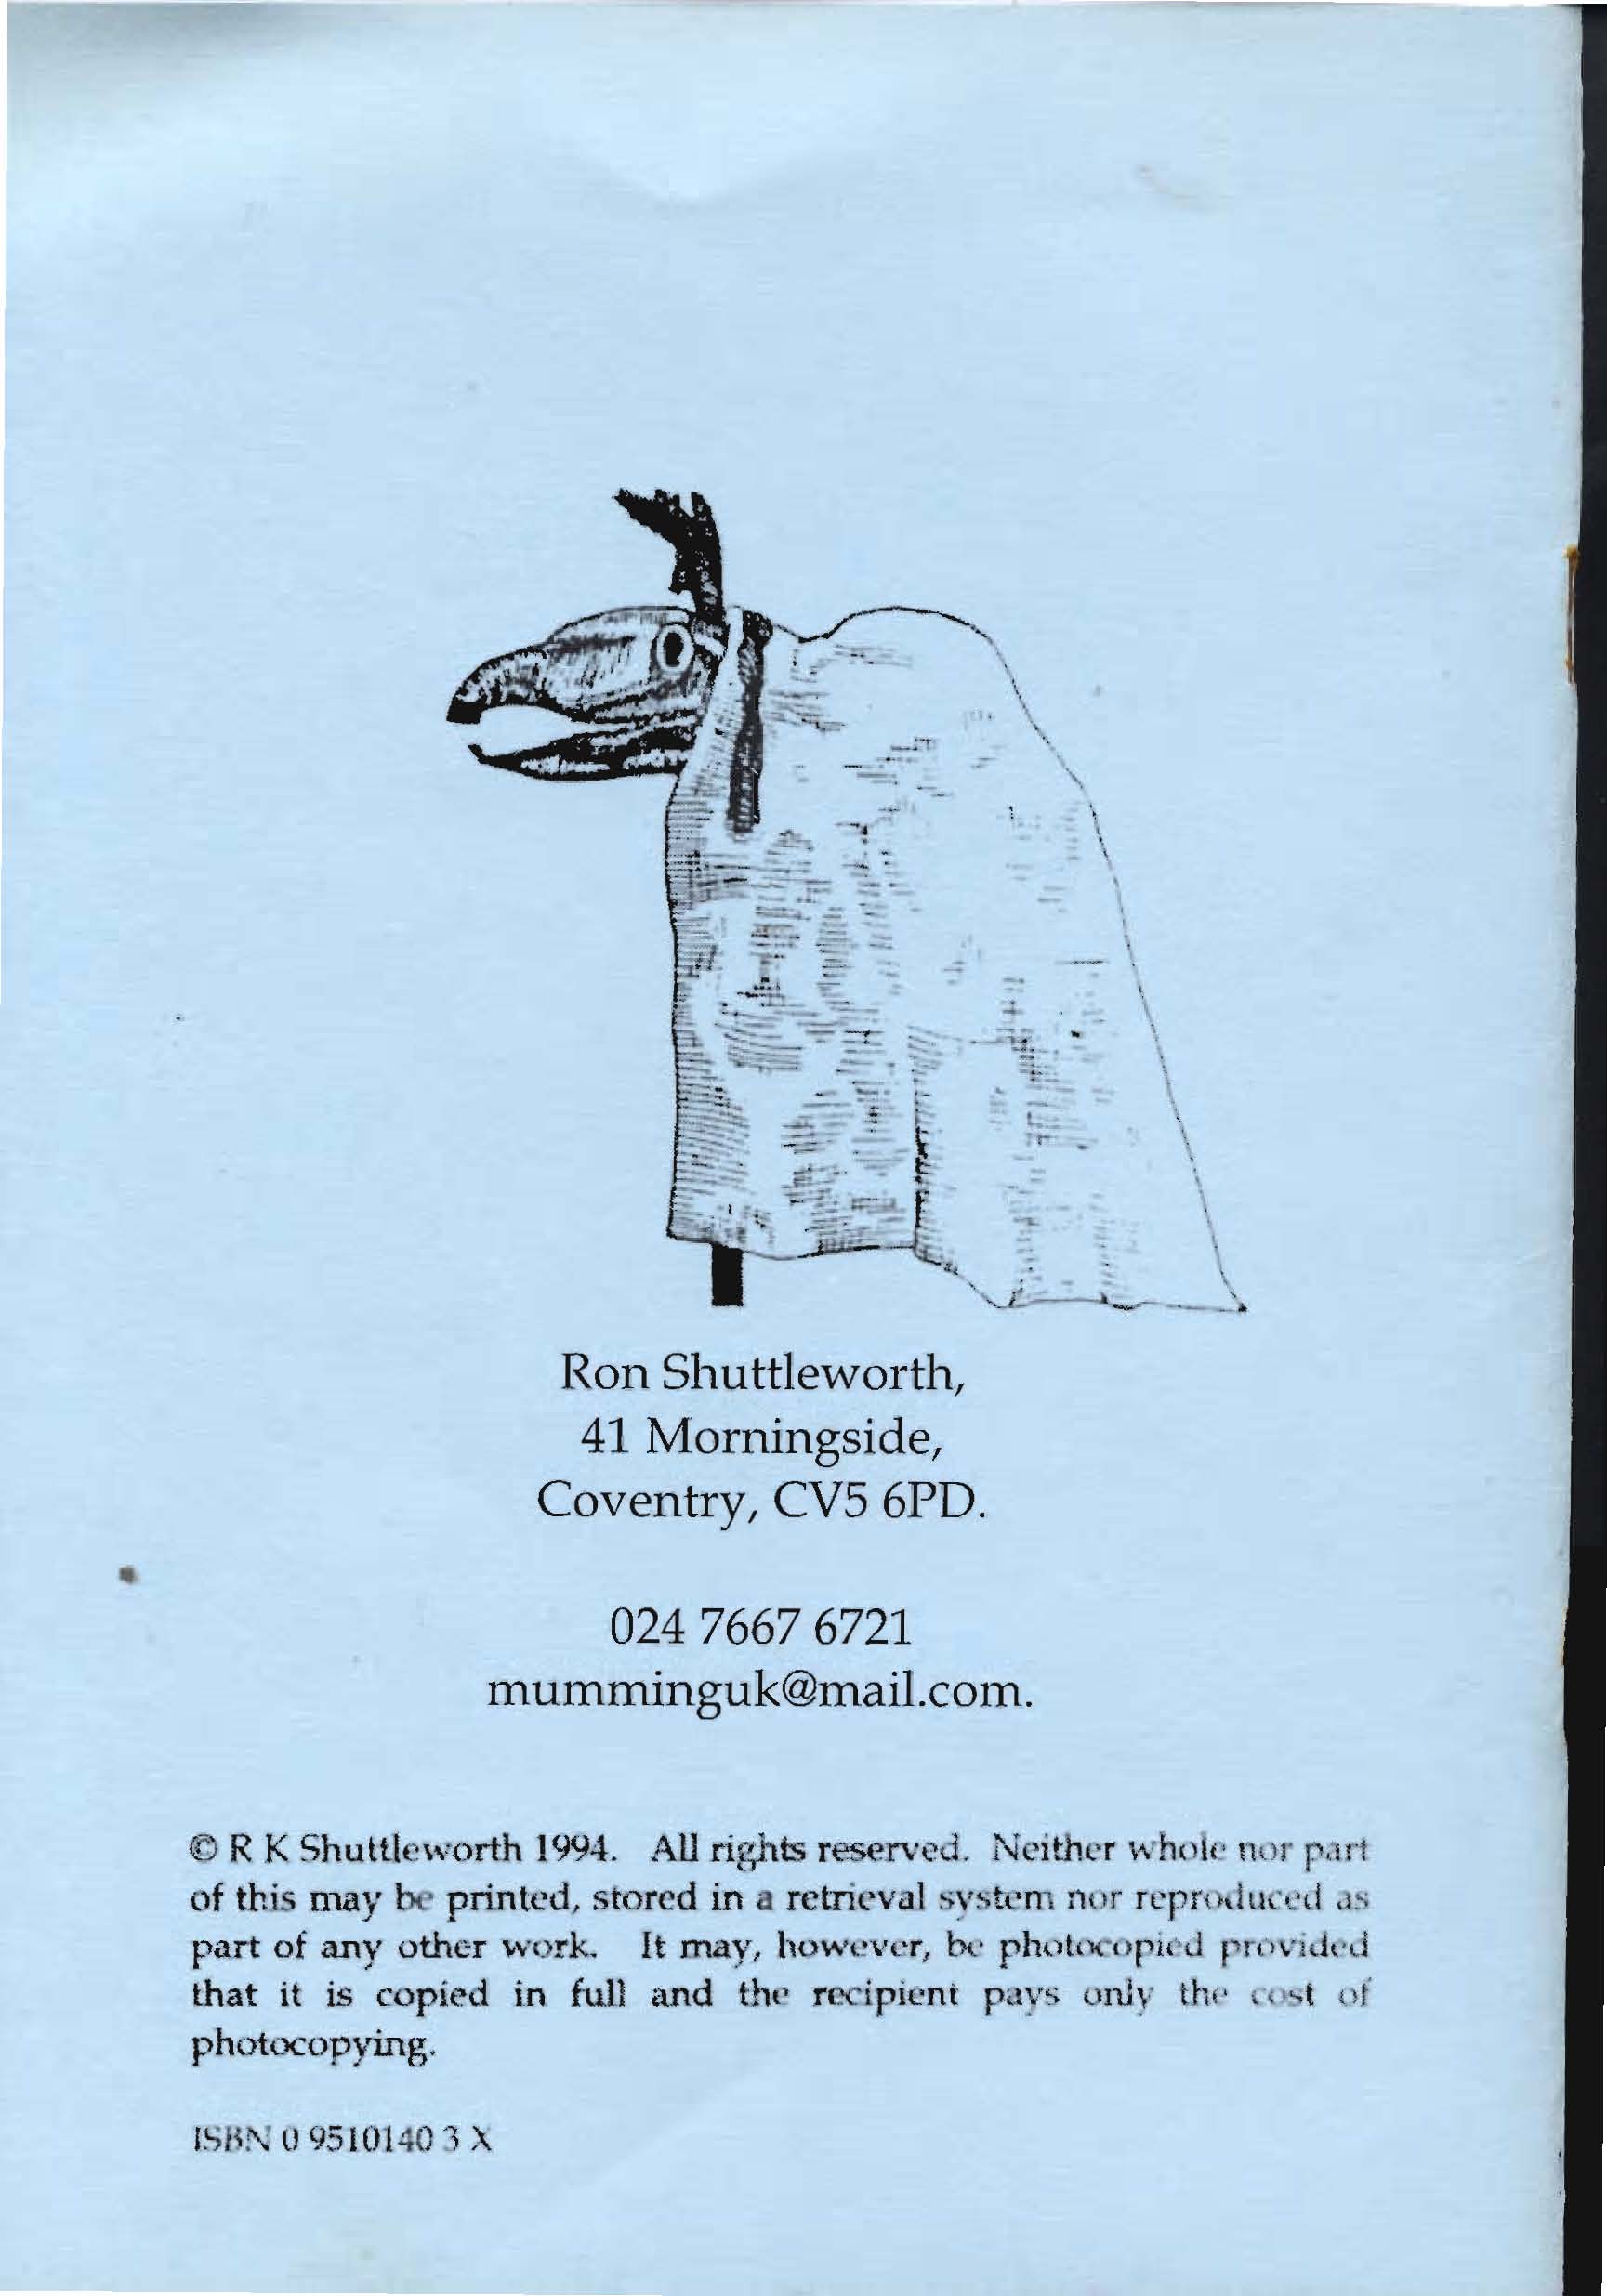
MAST BEAST. The head is mounted on a pole and the operator is concealed under a cloth. There are two basic variations .
THREE-LEGGED • Operator stoops with the pole acting as a front leg. I contend that there is an example of this depicted in the cave paintings at Lasceaux where it used to be called “The Shaman” but now seems to be titled “The Unicorn“.
- TWO-LEGGED • Operator walks upright and carries the pole. There are two categories visually similar to the two-legged mast beast but which differ in construction; i.e
- FRAME-MOUNTED Animal in which the head is mounted an a rucksack-type frame and is above the operator.
- CARNIVAL HEAD. in which the operator’s head is inside that of the animal which is supported on either his head or his shoulders.
TOURNEY BEAST. This animal has a horizontal body, through which projects the head and usually the upper torso of the operator or ‘rider’. Two kinds are –
1) Carried on the shoulders, operator’s head disguised.(Padstow, Norwich)
2) Suspended from the shoulders to waist-level or fixed to a belt. Tourney beasts can also he classified by their mode of operation: a) The character is all in the beast. This includes Padstow/Minehead etc. b) The character is all in the rider and the animal does very little.
3) Beast and rider have separate (conflicting?) characters.
There seems to be a feeling among folklorists that the tourney beast with rider is not traditional to England and came from the Continent via court-type revels. Although the riders of theatrical tourneys often have dummy legs, E C Cawte, p.197. notes that in ‘folk’ situations dummy legs were not used. A variation included for completeness is a sort of Tourney Man in which one person seems to be carrying another on their back, perhaps in a sack or bin.
There is a type of ‘horse’ which occurs in some Plough Monday teams made from a bed-sheet as a cloak. The corner is pulled over the head and tied or bound to create a ‘nose’ and to leave two hooded apertures for the eyes . Difficult to describe but very easy to make after seeing one (Scunthorpe Museum) or a photo.
There is a type of tourney beast called a SIEVE HORSE which is not easy to classify. The operator wears a long coat which is cut to cover a circular or oval hoop usually positioned a little above the waist. A very small head is attached to the hoop and pokes through the coat at the front. The jaw snaps and there is sometimes a tail. The name comes from the fact that the frame was often made from an old sieve or riddle. Examples can be seen at Abbots Bromley, and in some Wooing Plays where it is interesting to note that if the operator speaks it is in the character of the animal using the first person. In some of the latter, the operator’s head is disguised by a ‘horsy’ sheet covering mentioned above.
There are other categories of beast which have so far been little exploited. Examples include- Pantomime beasts which develop by accretion into, Chinese Dragons. I’ve seen kids mumming with a six-legged one and the Cock-horse which has a head on a stick which passes between the legs of the operator and is otherwise known as a Stick Horse.
We might also consider: Mechanical Animals, built round a bicycle or a cart. There is a two-wheeled dragon depicted at a celebration In the ‘Low Countries’ in a painting by Preter Breughel the Elder, (1530-1569) Also the Ventriloquist’s Dummy. c/f sundry life-size models or Rod Hull’s ‘Emu’ . Any animal whose operator is visible as a character in his own right offers scope for techniques classified as fooling.
RESOURCES.
Before making any decisions about what beast to make, you should assess your available ways, means and sources of supply. I shall expand this in detail because I have found most people to he open, honest and un-devious and they therefore often overlook possibilities for easing their paths and for saving money.
Ideally you would have access to: Artistic and Designing skills. Engineering, Mechanical and Technical skills to contrive and make structures and mechanical devices. Skill in working materials -sculpting, modelling, fibreglass. Skill in working fabrics -dressmaking, tailoring, etc.
You should find out what services you can command. e.g.
Woodworking machinery -band-saw, router, sander, plane, lathe.
Metal-working machinery for cutting, working and bending sheet and tube. Gas, arc and spot-welding. Thread-cutting. Turning. Sand -blasting, spray-painting, electroplating.
Fabric-working -Versatile sewing machine, industrial stitcher.
Discover what materials you can get on advantageous terms, including– Heavy dowel and special woods . MetaI, tube, sheet, bar, non-ferrous, nuts, bolts, screws. Fibreglass, plaster, latex, glue, paint, cloth, tape, Velcro, zips, ribbon, rags, dye.
At this point you should interrogate every member of your team, including yourself, to find what each can do, get done or scrounge from work, family, friends or neighbours. Do not accept a quick answer -get everyone to really THINK about it. If necessary, run through my lists with them. Having acquired this information, do not he shy about using people for the maximum advantage of your team. (and ensure that, if their help was legal, they get public credit and thanks) Note-:You do not only thank people for this time, but for the next! Ideally design and production should be in the hands of as few people as possible. [Unless, that is, you really want a camel!] One person , and one person only should have overall control.
FINANCE.
Before starting. ensure that your team accept the need for proper funding. You should have access to whatever you need, as you want it. You may reduce costs by exploiting your colleagues but you must be prepared to pay, quite heavily if necessary, to get the best materials or skills. Remember, your goal is strength, durability and a long, long life, and that there is a great difference between saving money, and doing it on the cheap. Considering the labour involved there is no economy more false than that made by using second-rate materials. Whilst It is not a prerequisite, you may feel that you would like to learn about the traditional background before you start. The definitive work is Ritual Animal Disguise, E.C. CAWTE, Folklore Society, 1978. I know of no discursive study of revival animals, but the Morns Ring used to have a Beastly section in Its Archive. This, along with its Keeper, Phil Underwood, appears to have gone AWOL and any up-to-date information would be welcome.
DECISIONS! DECISIONS,
Making animals involves surprisingly large amounts of thought, time and labour, as well as expense. The difference between best and worst is only minimal, and largely a matter of planning. When you finally leave your Side, do you want them to repair and renovate your creation to give it the longest possible life, or sigh with relief and consign It to the back of a garage.
CATEGORY OF BEAST.
In this section an attempt will be made to show the range of choices that are open to you, and the way in which one decision can effect another. Having got your list of available skills, goods and services you will he able to bring these into the equation. Because the famous Betley Window and the early paintings and records of Morris in civic processions indicate a connection with tourney horses, the first collectors sought eagerly for survivals. Until recently, revival sides with this class of animal tended to be those of long standing. Lately however, there seems to be a resurgence of interest In the genre. The advantages and problems of size should be apparent and the ‘rider’ has the opportunity, to converse and interact with the crowd. Obviously, it does not provide the anonymity on which many operators rely for their personality-change Popularity then switched to 2-legged mast beasts, and for several decades they were predominant. A later trend was to use the Carnival Head and Pack-Frame types of mounting. Except for large and heavy fibreglass creations, it is hard to explain this preference unless people think that the mast construction is going to be difficult to make. It seemed almost obligatory for every team to have a beast, so there may be pressure to find new and different animals and people take the easy way out. I am not saying that helmet and pack-frame mountings are bad, but it is important to be aware of the constraints applying to them, so I will look at the three types in detail.
The pole-mounted head offers by far the greatest range of expression and activity, and. is probably essential if you expect to dance vigorously. A reasonably competent operator can give life and character to even a simple design, and a good one can give inspired performances. However, heavy heads become tiring.
The pack-frame is best for supporting weight but it, and to a lesser extent, the carnival head mounted on a hat have a limited range of movements and tend to be ponderous and slow. There is less scope for improvisation by the operator, and it is important to understand the corollary, that the impact of such beasts comes from their appearance rather than their antics and it is on this that they will succeed or fail. They must look impressive and this depends mainly on the design and finish of the animal itself, the operator contributes less, although he can mar the effect by inappropriate actions. Perhaps the pack-frame might be the best carrier for the ultimate in high-tech animals which has everything mechanised with the operator just working switches. The truth of the much of the above can be demonstrated by analysing the obvious failures which are often only too evident. Strange fibreglassy ‘things’ drifting aimlessly around the outside of the set, and sad, unhandy creatures with less character than the packing-cases from which they appear to have been so hurriedly fashioned. Personally, I also deplore those ‘cuddly toys’, which seem to have been discarded from some giants’ pram.. There is a wide range of effective 2-legged animals. The extremes can be represented on the one hand by a huge carnival-headed pig which parades most majestically and impressively, and on the other by rather crude goat with a small super-light head on a very short handle which darts about with lightening movements and a rapidly snapping jaw.
SPECIES
Bases for choice could include local legends or folklore, and the crests or logos of municipalities, titled families or prominent local firms (sponsorship). Avoid choosing an exotic animal beyond the scope of your available skills. It is better to have a simple beast which works than a fancy one that doesn’t. There is no reason. why your creature has to be of any known-or imagined-species. Two hinged planks with painted balls for eyes becomes an effective animal owing nothing to reality. You now need to decide how you are going to make your beast and what techniques and materials you are going to use. You will require a broad plan which should cover: Internal Features , Money-eating, Storage for accessories; Degree of breakdown for packing; and Colour Scheme, (better decided sooner than later.) If any part is likely to deteriorate or wear, make provision for its easy replacement. Special Effects -lights or noises, smoke, breath blown from the nostrils, Moving parts such as swivelling or waggling ears, controlled tongue, moving eyes/eyelids/eyelashes, etc. etc. Design/construct everything for strength & long life and ALWAYS ASSUME A VERY HIGH LEVEL OF NEGLECT, MISUSE AND ILL-TREATMENT,
CONSTRUCTION.
To help you in your choices I am going to describe some commoner techniques in detail. It should be stressed that this is not comprehensive or definitive. The Parts of a beast are : HEAD, FRAME, SUPPORT & HARNESS, COVERING & OPERATORS COSTUME.
HEAD. Several construction methods that can be considered including.
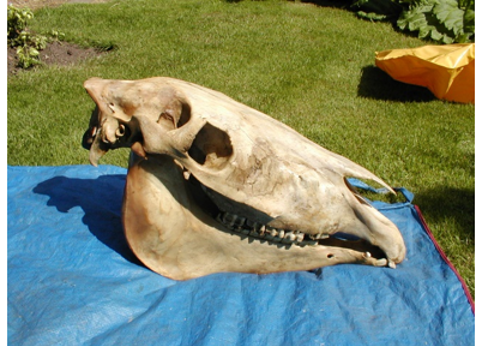
1) USING AN EXISTING SOLID OBJECT, of which skulls are the most traditional, usually for 3-leg mast beasts. (Telephone conversation, (‘Ragged Hero’ speaking) ‘Hello, is that the slaughter house? Do you sell horses’ heads?’ ‘How many would you like, sir?’ ‘Er … just one, please.’ ‘Small, medium or large. sir?’ ‘Er … Medium, please,’ ‘Would you like the flesh boiled off?’ ‘Yes please ‘ (Ragged Heroes advise getting the brain removed’) This is a nice story but would not happen today. Whilst researching this update I learnt that people in Wales seeking to revive the Mari Lwyd custom are finding that they can no longer get a horse’s skull from an abattoir. The reason for this is that it all comes under the jurisdiction of the Animal and Plant Health Agency (APHA) which is a branch of DEFRA. Apparently you have to register with them before you can obtain any ‘animal by-products’. Anyone would need to fill out and return the AB117 Registration Form on the www.gov.uk website to them https://www.gov.uk/government/publications/approval-of-sites-using-animal-by-products-registration. If anyone does this I would love to hear how they got on.
I’ve been told that you can get horse skulls made from plastic, but extensive Gurgling has only turned up two firms, both in the USA, neither of whom offer any details as to size or price. You may be faced with having to remove the flesh. I am informed that both boiling and acid can remove calcium from the bone, rendering it weak and brittle. The preferred method of cleaning the head is to expose it in an isolated tree or other safe place for about SIX months, and let Nature do its work. Quicker is a ‘sea cage’. The results are heavier but more durable than the boiled ones. I’m told that a week in hydrogen peroxide will whiten It beautifully, although traditional horses were often painted black. Some experience suggests that people find white skulls more horrific than black. A point for caution – horn is based on hair, not bone and will rot if buried, so it may need special treatment. Be wary of getting something too big. Bone is very heavy, and large-jawed heads are often difficult to mount in balance. Traditionally, skulls were often given eyes made from bottle-bottoms. You may feel inclined to do some filling-in, particularly in the nasal region – foam supplied in aerosols is good for this. Teeth often drop out and are lost so at the first sign of loosening, extract and re-fix with ‘Superglue’. Why stop at horses -with the whole animal kingdom to choose from you are limited only by size and availability -have-you seen the Wart-Hog?1 What a chance for the Whipsnade Morris! Other possibilities include stuffed heads, which might need a special internal structure for the pole. I once saw a pig whose plaster head may have once graced a butcher’s window (it was driving a sports-car in Bromyard).
2) SCULPTED MATERIAL such as wood.
3) ‘FORMED’ MATERIAL -plaster, papier-mâché, fibreglass, etc. Formed materials are built up on a roughly-shaped core which is smaller than the finished product. Some will require the skills of a modeller or a sculptor who works in clay . Cores are often hollow and can be made using wire-netting, wicker, a tin can -or several riveted together, or even an inflated object like a balloon. Solid cores can be removed later, Possibilities range from concrete to dense polystyrene foam (which usefully dissolves in petrol and so can be removed from complex shapes).
4) MOULDED OR CAST MATERIAL. For this method a full-sized and finished model is made (Plasticine, clay, etc) and a plaster mould made from it Material is applied to the inside of the mould and allowed to set. Very high quality finishes can be achieved. Materials include those listed under (3), and also latex rubber of which more later. An advantage is that as long as you have the mould, repeat copies are easy to make.
5) Other ideas could involve sheet-metal or wicker. Not all methods are mutually exclusive and could be combined. Choice will be affected by the results desired and the skills and materials available.
WEIGHT. How much this needs to be studied depends upon the uses to which your beast will be put. In the case of a tourney animal it is worth noting that to achieve balance, a heavy head may need to be heavily counterweighted at the rear, making lightness doubly desirable.
BEFORE CONSTRUCTION, consider the requirements of. the jaw hinges and firm, strong, demountable(?) frame -or mast-fixings. Any other demountable features -horns, ears, etc. Requirements of any special features >housings or channelling for machinery, pipes, wires or controls. Fire-breathing for dragons is a bit too specialised for consideration here. Some materials do not offer strong attachments but points can often be built In during construction -threaded metal plates or wood for screws. Replacement of vulnerable or less-durable parts.
SHAPI NG. I may have given the impression that I expect you to be able to find an accomplished artist to make your head for you, This of course is the ideal, but you will probably end up having to do the job yourself. Ideally one should observe the chosen animal, alive or stuffed (OK, OK, dragons!) but children’s picture books can he helpful as the animals are usually simplified. It is essential to study the shape of the head and to get it right. Aim for an outline from each of the three directions, the side, the front and the top . The rest is detail, and need not be perfect. Just as some artists • such as the cartoonist ‘Hero’ -can, with a few pen-strokes, draw an animal and give expression to its face, so one can create a most effective beast using very simple shaping and detail. A skilled operator can give a great deal of character to a very simple mast animal, but this is harder with the carnival-head type where range and speed of movement are limited by the strength of the operator’s neck. The character and effectiveness are therefore likely to be more dependant on the design and appearance of the head. If the animal is to he worn as a hat, balance and weight are critical. The centre of gravity of the animal head must coincide with that of the operator or severe neck-strain will result My personal feeling is that mast-beasts should not he cuddly. They do not need to be horrific, but to be effective they should have a hint of mystery and veiled menace. The genre frightens dogs, and children between one and three years, whatever you do.
EYES . One sees animals whose designers have not studied the positioning of the eyes. Prey-animals have theirs set to the side in order to cover a large area. The eyes of predators are set forwards to give the best range-judgement and attack accuracy. Although eyeballs are round, their visible shape is usually modified by eyelids, which may cover the upper part of the iris. Apart from paint there are many possibilities for eyes. Tradition gives us bottle-bottoms and large marbles. Lamp-glasses from older cars have internal prism structures which sparkle effectively. My original attraction to eyes lit by electricity was deterred by the weight and cost of batteries powerful enough to produce a brightness effective in daylight but the wide range of modern specialist LEDs and the power of modern batteries offer many possibilities. If the eyes were translucent and set on the sides, one could drill a large-diameter hole through the head between them so that light shining in one eye causes a glimmer in the other. There is a plastic that shows coloured patterns which have a three-dimensional, holographic effect and which makes nice eyes.
JAW. If the jaw is to open it is often easier to construct and shape the head as one piece and afterwards to saw the lower jaw free. An exception might be when using fibreglass or similar and you want to incorporate hinges etc. in the material. In this case the jaw could be wholly or partially detached before all the layers have been added. With hard rigid materials It is difficult or impossible to get a jaw anatomically correct, due to the absence of cheeks . If it is made small to give the natural size of mouth-opening, the jaw angle looks wrong. If the jaw is hinged near to its ‘correct’ place, the mouth is much larger than in nature. On the whole, I favour the latter because it makes the beast look ‘happy’ and facilitates money -eating . Where the appearance of the real animal allows, a realistic compromise can be achieved by having a long jaw working between pendant cheeks which are fixed to the main head I have seen long canine teeth which fitted Into holes in the opposite jaw, thus disappearing when the mouth was closed. –clever ! Some operators value the ability to close the jaw accurately on small objects, hat-brims, etc., and a jaw which does not reach right to the front of the nose will restrict this. If the jaw opens by gravity, the hinges need to be very free-moving. Used ones may be better, or you might have to sort through a boxfull. Leather is OK, but lacks lateral precision . Skulls can pose special problems. Either the jaw and the head must he fixed to pieces of wood or metal which can be hinged together, or the natural pivot can he used. In this case a way must he found to effectively replace sinews etc. which originally bound It together. There are three common ways of operating the jaw:
1) A downward-projecting rod fixed to the underside of the jaw. In this case the jaw need not he hinged at all -or can be hinged loosely to allow lateral movement. This enables the beast to grind its teeth sideways in a particularly horrible way. The disadvantage is that it exclusively occupies one hand of the operator.
2) A string from the top of the jaw to the underside of the head In front of the hinge. This then must run through rings or pulleys. Disadvantages are that It is visible in the mouth, and that it may be harder for the jaw to drop freely.
3) A lever projects backwards past the hinge, and a string imparts a downward pull. This is the method which I have used . A variation is to use a rod that pushes the jaw closed, instead of a string. This can also be used to open the mouth and makes possible a very rapid snapping action.
There are other possibilities which include: The jaw is held shut by a spring and pulled open by a cord from its underside. this is likely to he visible, but with better mechanicals is favoured by some. I have seen a large carnival-headed pig whose jaw was counterbalanced to open end shut randomly with the head movement. ‘Bowden’ cycle gear/brake cable can operate jaws and all sorts of mechanical effects. For anyone unfamiliar with these cables, I point out that not only can the inner wire transmit a pull, but that the outer casing can push.
Money-eating can also cause problems. A critical factor is the angle between the mast and the floor of the jaw or throat . When the mast is vertical, this floor should he horizontal. or better, sloping down towards the back. If it slopes to the front the beast will have to tilt or turn Its head right back in order to swallow money. You could try exaggerating the slope of the underside of the jaw in order to Improve swallowing ability. The effective angle of head-tilt needed to swallow money could be reduced by polishing the floor of the jaw to cut friction. Jaw-closing method (3) can also cause a problem by blocking the throat, but I overcame this as follows. A stout wire is bent into a u-shape. The ends turn out and fit into holes in the jaw being retained by staples, or washers on screws, The fabric of the gullet is attached to the jaw at the front and to the head at the back, leaving the sides free to allow movement of the wire. A piece of elastic supports the weight of the operating mechanism. A simple way to fit the tube is to start it at a hole just in front of the hinge of a long jaw, concealed behind the main ‘cape’ cloth. The throat extends into a fabric tube or gullet In which the money collects. This should be long enough so that a bulk of coins does not hit the operator in the face, and not so long as to bring tears to his eyes. It can be loosely tied to the pole to stop It swinging about, and the lower end can be closed with a tape, or a zip which is better, Do not leave money in the tube during storage, It may include sweets which deteriorate stickily. Ensure that neither the operator’s face nor the head’s workings are visible to the public as this destroys any ‘mystery’. For Tourney beasts you could use something based on method ( 2), or you can use reins. Fix one side to the head and the other to the jaw. Incorporate a short rigid bar m that part held by the rider. and both head and jaw can be worked by the same hand. It the beast has a very light head on a longish neck, the ‘reins’ can he supportive bars. The neck can then be a flexible tube. Multiple bars with crafty pivoting can then give subtle and effective control of head movements.
MATERIALS.
WOOD An ideal wood for carving is ‘Jellutong’, the wood of rubber trees. Much used by pattern-makers, it has negligible end-grain and is soft and easy to work.Try specialist timber-yards. Balsa is more durable than you might think and, of course, very light and easy to work, but strong fixings can be a problem. It is likely that you will have to build up your head from several blocks. Try to get the grains all running in the same direction to minimise the distortion due to subsequent shrinkage. If you have access to woodworking machinery, the best faces for gluing can be made with a table disc-sander. Consider whether some of the constituent blocks can be best rough-shaped on band-saw or sander before final assembly. Also, this may well be the time to construct internal channels and cavities, and to insert threaded plates and other fixing points. Chisels and gouges can be instruments of destruction in the hands of the unskilled like me, and I found that ‘surform’-type tools and a rasp were much easier to use. I also got good results with rotary files set in an electric drill. You need to get the tooth-form designed for wood.
FIBREGlASS. I have no practical experience with this except what was needed to discover that its use is not as simple as it looks until -as with everything else -you know what you are doing. It sticks to everything except what its supposed to, it hardens while you’re thinking about it, and experts can work sickening miracles with it [That should tell you quite a bit about me !] The material is surprisingly heavy -it is, of course, composed mainly of glass, and does not survive repeated impacts. A fine scaly reptilian effect can he obtained by covering small-mesh netting very thinly, so that the outline of the wire remains visible.
PAPIER MÂCHÉ A lot stronger than you might think -the Victorians made furniture of it. It is lighter than fibreglass. being wood-based, and easier to work with as it does not go ‘off. It must be protected from moisture. There is a variation of this, beloved of infant-school teachers, in which small pieces of torn paper are built up using paste. This technique, using good-quality unplasticised ‘Kraft’ brown paper and modern ‘PVA’ adhesive produces a material of great strength and durability. This slow, reversible build-up of a shape might well suit people who do not have instinctive artistic skills; indeed recommended practice suggests that after each few layers, it be allowed to dry (in an airing cupboard) before more is added. As with fibreglass, the consolidation is important for strength and the use of a roller after each application is desirable. This requires the core or mould to withstand applied forces. A thin coating of fibreglass, or of its resin alone, could waterproof and strengthen either of these. Fibreglass and paper are unlikely to take screws or bolts reliably. Plan to incorporate wooden pads, plates with captive nuts etc, during the construction. Reinforcement, especially for potentially vulnerable bits , is also better built in.
RUBBER This offers special qualities which can be very useful. It is flexible and more long -lived and durable than you might think, but not always easy to attach to other parts of a construction. A female mould is made of plaster-of-paris in a dish shape that will hold the liquid latex which is the form in which the rubber is used. The mould is sprayed with silicone release agent and then filled with rubber which will gradually solidify against the plaster surface. After a time the liquid remaining is poured off, and when ‘cured’ (i.e. left to dry) the rubber shape – called a ‘pull ‘ -is detached from the mould. The longer the liquid stays in the mould the thicker will be the pull. This whole idea may seem complex and off-putting, but it need not be so. When I used it I approached our local professional theatre which had a workshop staff. I found someone who designed and made my mould and provided the pulls. I made sure that I bought and kept the mould and ten years later when I wanted more, I contacted them again. I had no trouble in getting more pulls from my mould, which saved me having to buy latex -much of which would have been wasted. You may find theatrical people outside the professional theatre who use these techniques and have access to the materials. Their charges are usually very reasonable. Not only beasts, but also Fools or any masked character, could be made using this method. If you need to paint it use artists’ Acrylic paints from an art shop, as they are flexible and do not crack off.
MODERN MATERIALS. [Added 7.2019]
I have recently been made aware of a range of new materials of which I have no experience. These include Walt Disney clay to make a mould and mouldable plastic net moulded to it using a heat gun. There is also ‘Milliput’, a modelling material which air hardens and is available in several colours. Surfing the Web on “Masks” will turn up a wealth of information. Try http://www.props.eric-hart.com/how-to/donkey-mask-from-a-midsummer-nights-dream/
PAINTING. If the cloth and the head are to he the same colour, note that it is much easier to match paint to fabric than vice-versa. Try multi-mix ranges, There are sample tins which are a cheap way to get small quantities.
FRAME. The Simplest sort of frame is probably the MAST. The attachment to the head needs to be very strong, very durable and very simple to use. Greater flexibility of expression can be obtained by articulating the head to nod fore and aft. One method uses a parallelogram formed by the pole, which is hinged to the base of the head, plus a jointed rod which is pivoted to a short piece whose other end is hinged to the pole. When the rod was squeezed against the pole, the parallelogram lengthens and the beast looked upwards or downwards. It is important that the head has an acceptable position when the mechanism is at rest, so attention must be given to the positioning of the pivots and the possible use of counterbalancing springs, If two rods could be used independently, the head could be made to tilt Other ways of carrying the head include: Head mounted on a rucksack frame. If the head is rigidly fixed, the range of expression is very limited. It might he possible to mount the head on a one-dimensional pivot (nodding) or a universal joint giving the ability to turn, tilt and nod with great realism. Control would be the problem -perhaps two rods. It would have to return naturally to a neutral position. A smallish head can be built around a safely or crash helmet. I have seen one in which the operator looked out through the open jaw which was opened and closed by a harness on his own jaw. This is close to being a complex mask, but being able to see in through the jaw rather spoilt the effect. If the weight of the beast-head is to be born by that of the operator, It is vital that their centres of gravity coincide or severe neck-strain will result.
SUPPORT. The method which I have used with success has a handle projecting forward at right-angles to the mast such that the head is well positioned when the arm holding it is straight. This handle is strongly fixed using shelf brackets. If the jaw is actuated by a string, hinge a flat strip of metal to lie along the top of the handle. The string connects to the outer end of the strip with a detachable clip. The jaw can now be worked by the thumb of the hand which supports the beast.
For mast animals some people favour a harness similar to that used by standard-bearers. This may be rather restrictive as one can get greater expression with complete freedom to move the pole about. However, when using a heavy head for a long period, a detachable harness would ease things.
THREE.LEGGED MAST BEASTS. These pose special problems, of which I do not have first-hand experience, but here are a few points. Skulls tend to be nose -heavy, so position the leg as far forward as possible. I am told that a socket well and strongly fibreglassed to the bone is a good method. The imbalance will tend to force the bottom of the leg backwards, so it will need a good rubber end, or perhaps the leg could be cranked forward. It could be easier to have straps or cross-pieces on the pole so the operator did not have to support his weight by grip alone. A method of support and operation used by a traditional team from North Elmsall, near Pontefract, is as follows. ‘The pole had a forked top, sometimes and best made of iron with very thin extremities, which, driven Into the lower jaw of the skull, held it securely [it sounds like a hay fork] A piece of wood was fastened to the back of the skull, so as to enable the performer to open and shut the jaws at pleasure..’ The head and upper jaw therefore lifted on opening. TOURNEY. Head attachment needs to be both strong and durable. If the head is to be demountable, the fixings need to be simple and positive. Wing-nuts are ideal, especially if their bolts pass through open -ended slots rather than holes. A very versatile animal uses a head with many special effects, made like a mast-beast on a short pole poked through a hole in the frame but independent of it. This allows great variety of movement.
BALANCE. A tourney beast is obviously a lot easier to work with if the whole thing is balanced about the operator. Basic rules of mechanics apply, and the amount of counterweight required will he reduced by keeping the head light, getting it as close to the pivot (i.e. the operator) as possible and moving the counterweight away from him. Thus the operator should be as far forward in the frame as possible, and it should project as far behind as is practical or necessary. The counterweight should be firmly and rigidly fixed. In my own beast, I got maximum advantage from the counterweight by making the rear member of my frame out of very heavy iron tube (which was therefore strong) and filling it with lead. It should be remembered that gravity tries to bend the frame about the harness fixings. So do children. The frame should be as light as possible. It must not abrade or damage the cover, the operator or the public. Obviously the method of construction will depend on the skills and materials available. Wood, wicker and sheet metal are all possibilities, but the best is probably tube, either steel or light alloy. Alloy is light, strong and relatively easy to work. My own beast used tube from the thin steel hoops which supported the canvas top on a Land Rover. It is worth noting that frame-tents rot, some leaving a surplus frame which may be of aluminium • a ready supply of 2-and 3-way joints and socketed tubes. The flexible poles used on small and medium tents were not around in my day, but may offer possibilities. To bend thin-walled tubing without it kinking or breaking requires great care. The traditional method is to pack the tube tightly with sand, and this has been modernised by the use of special springs which are inserted into the tube before bending. There are also various hand-operated machines. Plumbers and electrical installers usually have tube-bending equipment which might also be for hire at D.I.Y suppliers. If you are desperate, good bends can often be achieved by carefully working the tube round a large-diameter former or through a hole In a thick piece of wood. The success rate can be increased If there is a deep groove which is a good fit on the tube, It occurs to me that the head itself could act as the front cross-member of the frame if it had been designed with this in mind. A simple and light frame can be made using a light-alloy rim from a bicycle wheel. This goes In the middle of two long canes which are fixed together at their ends to make a boat-shaped frame. Much of the above would also apply to the Minehead/Padstow type of animal, which is carried on the shoulders. Because they tend to be much bigger, lightness could be even more important.
TAILS. Some tourney animals have had waggable tails. The mechanism need only be a simple pivot and a string. In some traditional customs people would try to pull out hairs ‘for luck’. If you have a tail, people are going to pull it anyway and the traditional defence of sharp tacks would probably not be acceptable today. This would also be true of the vicious teeth possessed by some old animals reputedly to inflict painful bites. HARNESS. Some animals are attached to the operator by a belt only. I suspect that It limits what one can do with the beast. Mine had shoulder straps. . which should be strong and wide enough to carry the weight comfortably. I used car safety belts. If there is enough room within the frame for it to swing forward and back a little on the shoulder straps, this can he used to give the impression that the man is really riding. Points to consider are: It should he easy to get in and out of. Straps should not slip in action. They should be comfortable, and not restrict blood-flow at the side of the neck. If you are going to wear ordinary clothes rather than specially-made ones, the straps should go underneath. Do you need adjustable straps to fit different operators’? If someone is going to spend considerable active periods in the beast then it is worth any effort to get them as comfortable as possible. I used to wear iron-shod clogs so that I could sound like a horse.
COVERINGS,
Mostly contributed by Jean Shuttleworth
.MAST ANIMALS. Ideally the cover, ‘cape’ or ‘hood’ should be as long as it can be without tripping or discommoding the operator. Traditionally the operator only has a small netting panel to look out of. This is very inhibiting as it not only limits his vision of events around him, but restricts his antics to those which do not blind him. With some modern synthetic fabrics It is now possible to achieve TOTAL ALL-ROUND VISION In all but the poorest light. The same effect can be obtained with some open weave cloths, which can have a ‘nap’ and appear quite opaque. THE IMPORTANCE Of THIS ABILITY CANNOT BE STRESSED TOO HIGHLY. It is difficult to appreciate the immense improvement unless you have had experience of both types, but the continued existence of netting windows is one justification for this booklet. You are enabled to see and exploit any situation around you. You can spot marauding kids who can be such a problem, or a toddler who is terrified and from whom you must keep away. You are less likely to walk onto a small child or that bane of all mast beasts, the crutch-high bollard. It would also he much simpler and safer if you are required to get involved In the dancing. One disadvantage with synthetics is that it can get extremely hot and sweaty inside, so some sort of ventilation and steam-vent is very desirable. A panel of net round the top of the cover will give ventilation with an inner piece of cover fabric hanging inside to visually blank off the interior. When fitting net air-vents, it helps to position one where it can act as a window for use in poor light which renders the cloth opaque. With some heads, people can look inside through the mouth or vision panel. I believe it is important that the operator cannot be seen at all. Once while I was squatting to talk to some children one of them spotted me through my ventilator. His insistent “There’s a Mister In there!” rather spoilt the moment but it shows that they had not thought of this before.
These lightweight fabrics are susceptible to any sort of strong breeze, which can be countered by a heavy or weighted hem round the bottom of the skirt. Although you might wish to leave the question of weighting until you have tried it out it would be prudent to design In a hem large and stout enough to take weights should you want to use them. There are a number of ways of weighting a hem to prevent it blowing up in a wind. These include individual sewn-on weights, a piece of suitable chain, or weights threaded or nipped onto a cord. The best is sold in curtain shops and consists of woven tube with bits of lead inside. Sold off a reel, it is available in at least three grades. Another problem is that some synthetic fabrics are rather brittle and easily cut. Care must therefore be taken when packing etc. to protect them from contact with hard edges. This situation is easily mitigated by having a readily removable cloth, which also allows easy washing . Several means of attachment suggest themselves, but the best has to be Velcro. It is made in different weights – if you can find a supplier, or you could double up if one strip is insufficient Do not economise on length. It grips very tightly, and will therefore need to be attached strongly. Machine sewing is much the safest and needs overlapping by going round each end of the strip twice. If hand sewing is unavoidable use a heavyweight thread and small stitches. Ordinary dressmaking thread hand sewn will break as the Velcro is opened, but if it must be used, double thread might work. It is wise to strengthen the points to which it is sewn. A press-stud will ensure lateral location. Another advantage is that under ultimate strain -like someone treading on the skirt – the Velcro will part without damage to the cloth, although a child’s vicious attack could reveal all. There needs to be enough fabric for the operator to move freely inside. The sort of cloth which you are likely to buy is either 36~(90cm) or 45″(117cm) wide. Allow 3 pieces of 36″ or 2 of 4 5″ for the width of the hood. The fastening at the top will depend upon the nature of the head construction, but the fabric will need reducing by tapering the seams, and/or pleating or gathering the rest to fit the base of the head. Net can be dance-dress net, which is nylon and comes In a wide variety of colours. If you can’t get an accurate colour-match, a darker would look less conspicuous than a lighter one.
When shopping for fabrics, try a market rather than department stores. The latter tend to carry only fashion materials, and have little choice of plain cloths which are often best for visual impact. Buy lavishly as you are dealing with a most imprecise ‘garment’ and to be short of cloth through economising is an unnecessary worry. Acquire extra cloth anyway for repairs. The quantity of fabric will depend on the design of the head and how it is carried. An animal which bends down to eat money may find its hood getting under the operator’s feet -though it is part of his skill to avoid that hazard. Unless one person is going to monopolise the beast, the cover should accommodate everyone except the side’s man-mountain or their dwarf. Man -mountain could still wear the beast though with the hood at hip level he might look a bit odd -especially with breeches and conspicuous socks. Two different-sized hoods are an option. It might be useful to make up the hood giving plenty of length and fix it to the head In as temporary a manner as possible. Get the operator to wave it about etc. and then decide how long to make it by pinning up the hem whilst he has it on. Don’t necessarily cut off all the extra cloth.. if it is a lightweight synthetic, It will hang better for a heavier hem. The line of the hem bottom is unimportant unless it is a very conspicuous colour: people watch the head.
TOURNEY HORSES. Cloths for these are quite different in concept. A heavier fabric is needed to hang straight, although the weight of the beast and frame may be such that the cloth should not increase the load more than can be helped. Furniture fabrics can be considered, if they are not going to need washing. They cost more than dress fabrics but, depending on the character of the beast, can be very rich and impressive. Many furnishing fabrics, especially curtainings, have a tendency to fray, so oversew all cut edges with a zig-zag stitch. Furnishing fabrics are usually 48 ” wide. Fine detail can be added to light-coloured cloth by using ‘fabric pens’ which are reasonably colour-fast and permanent . COSTUME. With a mast animal there is little to do, although trousers which approximate to the colour of the beast look better than white stockings. An operator with strongly-contrasting clothing can be seen through some of the more open-weave fabrics if the light is right -so dark or matching clothes should be the rule. If your side goes to some trouble to prevent the public from seeing its animal loading up, it could be important for the operator to avoid distinctive footwear, etc. A friend was identified as the beastmaster by some children spotting that he was the only team member with slip-on shoes . A tourney rider’s special costume could be constructed to include the supporting harness thus spreading the load well and eliminating slipping straps. Clogs allow a horse to have a clip-cloppinq walk. Much depends upon circumstances, but points to consider include- the variations in height/girth of various operators. The concealment of harness. Ease of entry and exit which must be possible in public. Prevention of overheating. The effects of rain and splashed mud.(also spilt beer) Pockets for props, etc. Replacement of less durable parts, both in the construction and in the choice of repeatable materials. The extra strengthening of seams, buttons, zip-ends, Velcro etc., to resist ill-treatment and the general clumsiness of the inebriated. Ease of cleaning/washing.
MISCELLANEOUS POINTS.
A mast animal may need a whiffler or minder to protect it from children. I recommend tourney riders to carry some sort of stick. I was once very glad of mine when faced with a small frantic dog which seemed to he trying to get under the skirt!!! Do not worry about tradition as it relates to Hobby Beasts and the Morris. Little is known for sure and nearly all traditional beasts existed independently of the Morris, although they may have become associated. USAGE. A complex and difficult subject which I have neither the space, the knowledge nor the experience to expound fully. A few pointers, however, are relevant. Ideally a beast should always have the same operator who should aim, to become skilled in its use and should receive due credit from his team. If he is good, his position and value should be recognised. Too often the animal is regarded by the dancers as a low -grade nuisance and is operated by anyone who is not doing something else -or by the side’s problem member who can thus he shunted off and forgotten. Teams with this attitude are probably better off not having a beast at all. A new beast-master should start at home, practising in front of a large mirror, so that the range of possible expression can be devised and mastered. You may well find that the animal has its own character and sympathetic operators claim that, usually when you are not trying too hard, the beast can take over and start controlling you. This may sound far-fetched -but only to those who have not experienced it. WARNING . (seriously) If the beast becomes reluctant to let go when you remove it, give it up completely!
At a certain age, (circa 1-3 years) small children are both fascinated and terrified by animals particularly 2-legged mast beasts. Well-meaning parents often try to reassure the child -‘See the nice horsey’ -but this will be unavailing. You should learn to recognise the symptoms – the crumpling face etc. -and move away at once. Anything else only makes things worse .
Never chase a child into a corner from which there is no escape.
Fascination in older children can be a real nuisance -they will persistently bait and attack you. Your team should be aware of this. and detach a minder for you if you appear to be in trouble. In general though, a well-placed kick or an ‘accidental’ collision will usually do the trick. Don ‘t run or hide -It makes the game better. Try ‘talking’ to adults or sitting down to watch the dancing. All-round vision can get you a reputation for psychic powers from people – even grown-ups – who seem convinced that you see through the eyes of the animal. Not only children can be a hazard. A friend was forced to flee into the ‘Gents’ by the attentions of members of a Women’s Institute who had just heard about the fertility aspect of his animal. It is generally accepted that beasts do not talk. They should he silent at all times but in emergencies may make noises appropriate to their species. Many Morris Dancers consider it to be most important that members of the public should never see anyone getting into or out of the beast nor see it when it is unoccupied. Some teams just carry the head wrapped in its cloth, and change out of sight; but others take elaborate measures to disguise the animal in transit, and to confuse the public as to who exactly is inside it. Note that all this is spoilt if the animal is seen chatting to colleagues or obviously taking a drink up under the cloth. If a team member needs to speak to the operator he should do so openly but addressing the animal not the person inside. Ingenuity has enabled some animals to take a drink In public. EVENTS. The Fools and Beasts Unconvention is a weekend held annually in the autumn, where the drinking, eating etc. was interrupted by serious performance and consideration of technique problems and all matters pertaining thereto. Participants become members of the Illustrious Order of United Fools. It is organised by The Illustrious Order of Fools and Beasts, https://edwardsce.netfirms.com/Foolsandbeasts/FandBTop.htm The success and value of this is attested by the number who return year after year. It is from the collective experience of those attending, that this paper has grown. It is no longer restricted to Morns men -or to men for that matter. I have not been for some years now, and the focus may have changed Another weekend event is the Banbury Hobby Horse Festival, about the end of June. https://en-gb.facebook.com/banburyhobbyhorsefestival/
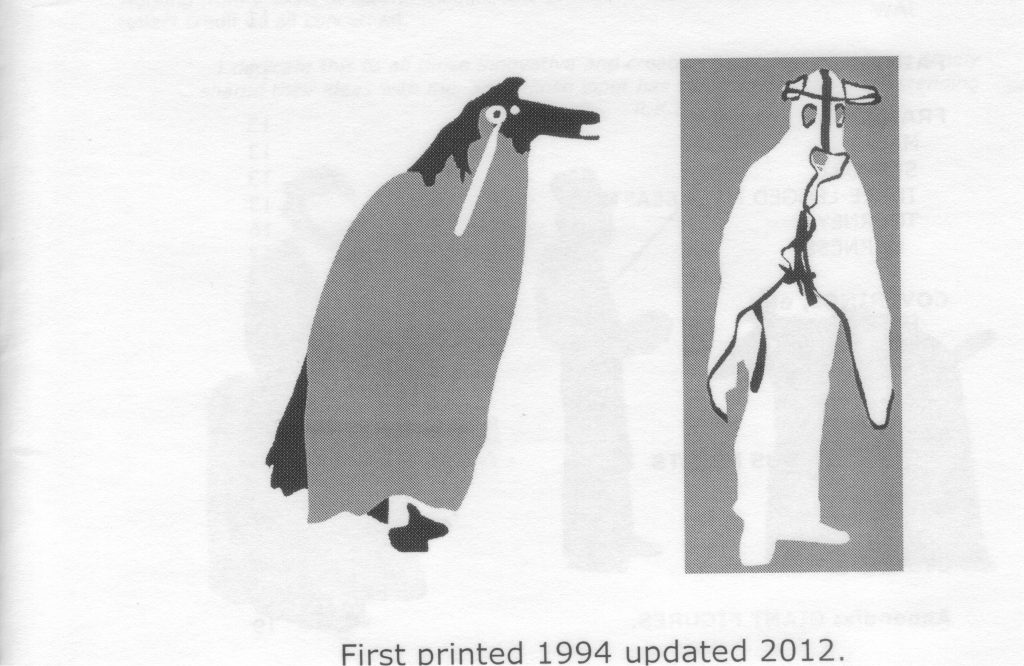
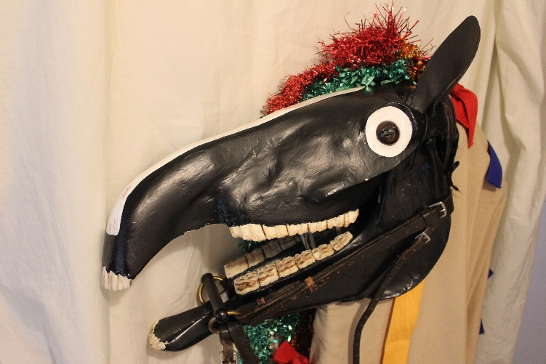
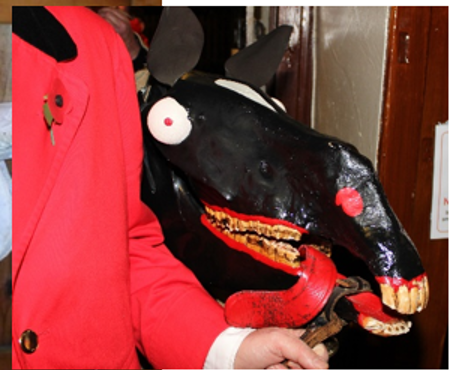
Appendix A: SKULL HORSES.
Appendix contributed by Duncan Broomhead, 3.3.2020.
A selection of old Cheshire mummers’ horses, showing method of construction. The bottom jaw is attached to a pole, the hinged top jaw is operated by a handle.
Height of horse and length of skirt varied.

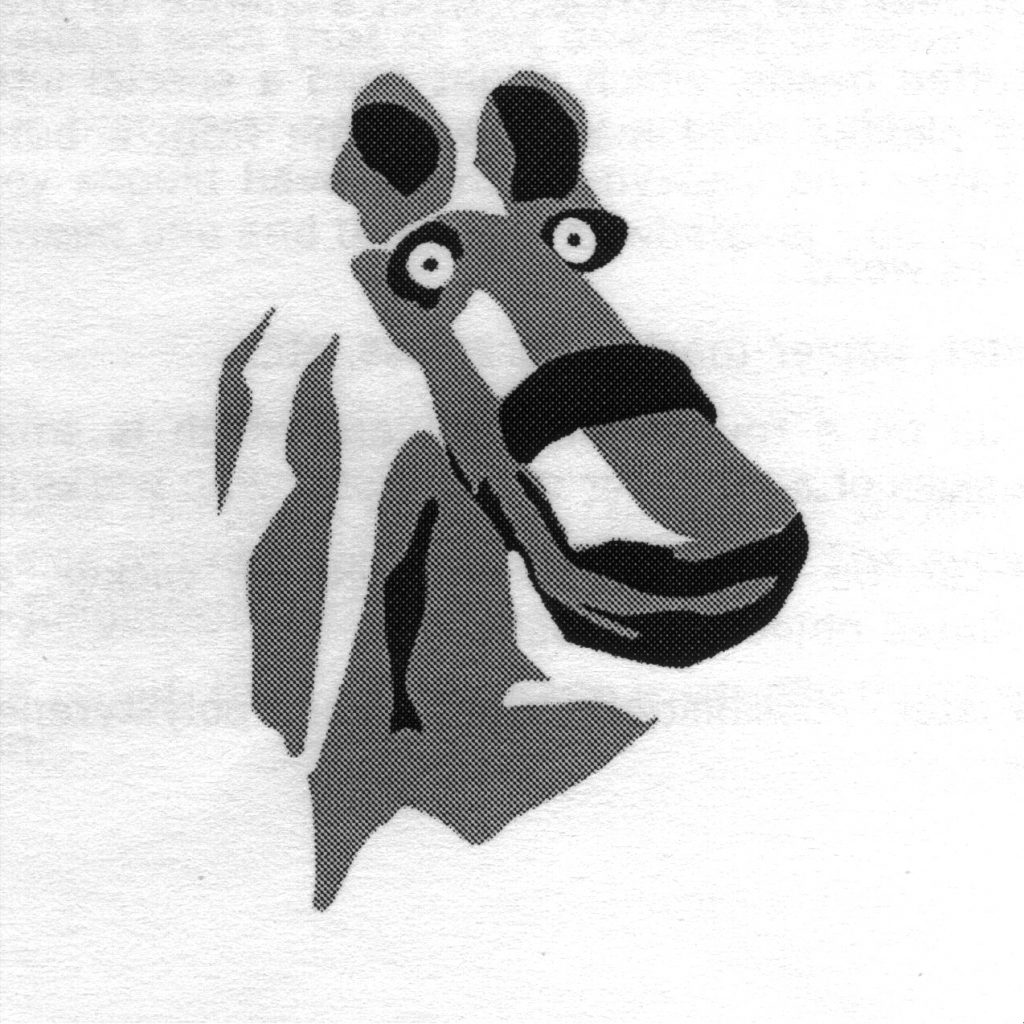
The first head I constructed. 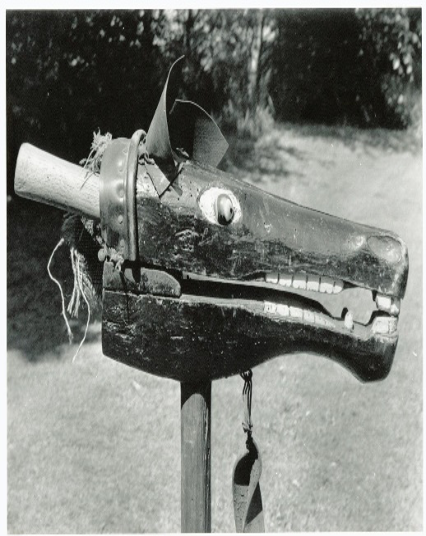
A wooden head, same operating system. 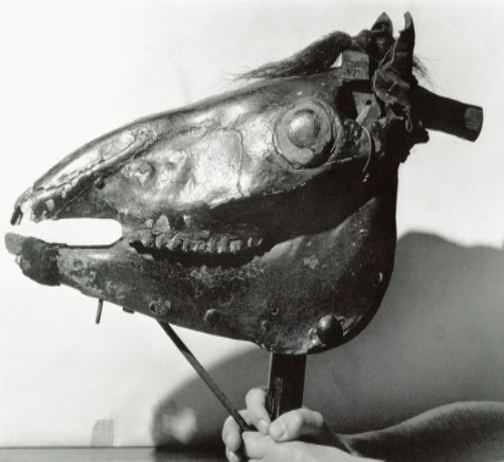
Higher Whitley 1939s, photo T. Mannion.. 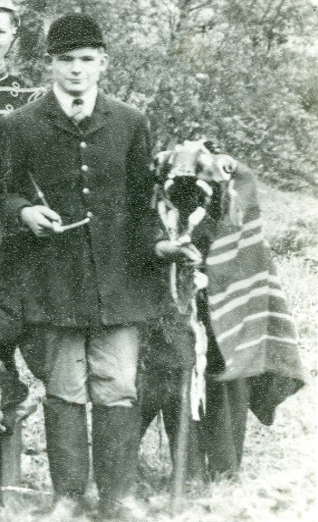
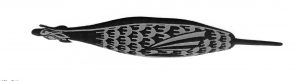
Comberbach c1949 
Alderley c1910. 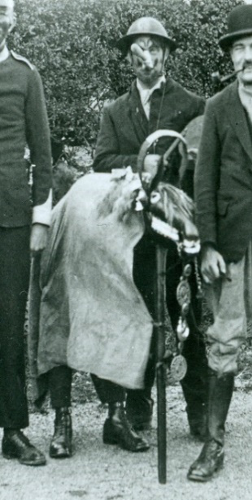
Seven Oaks/Antrobus, 1930
I was shown how to make a mummers’ horses head in the 1970s by Jim Wright of the Antrobus Soulcakers with additional info from Fred Barber Jnr, who played the horse with the Alderley Mummers during the 1930s.
Before you start making the head you must ensure that it is clean, free of any flesh, hygienic and safe to use. You don’t want to risk anyone getting an infection from it. The best place to look for info about how to do this might be a reputable taxidermy website.

Don’t try bleach, I used it once and ruined a skull, it became very chalky.

Fill the nasal cavity and the eye socket, leaving enough room to accommodate the eyes later. Also fill in the roof of the mouth. I use a two part filler, Bonda Deco Fill is my favourite, but I have used Ronseal Wood Filler. The filler can be sanded down after 15 mins, and like the skull itself, it can be drilled and screwed.
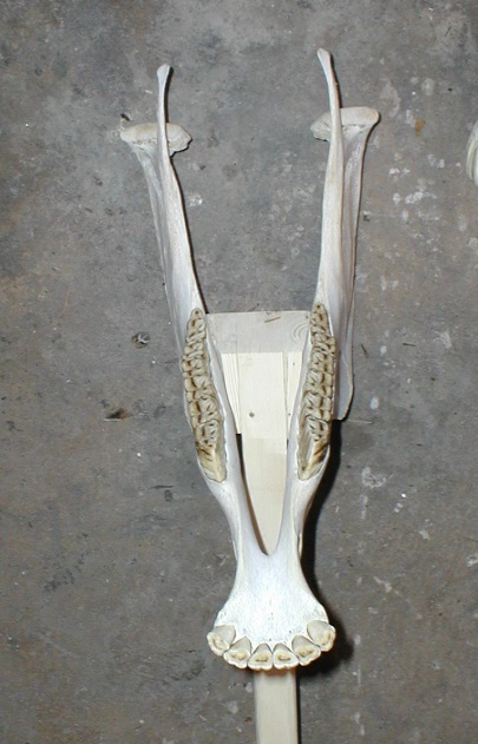

The inside of the jaw has contours that will make achieving a snug fit very difficult. When you use the skull the two halves of the skull will be put together so you need to find the point of balance. Roughly mark up where the pole will need to go and to use filler or packing of some sort to even out and depressions on both sides of the jaw. (see yellow arrow for example). Attach the blocks to the top of the pole to fit the gap between the sides of lower jaw.
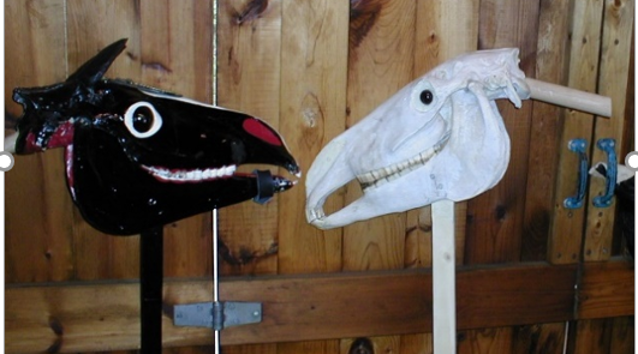
You will also need to decide at what angle you want to set your head. The most common way to do it is at right angles to the pole as seen in the black horse in the photo.
As an alternative, you can set the head at an angle as seen in the white head, giving it a more naturalistic look.
When you are operating the horse, you don’t want the two halves of the head separating.
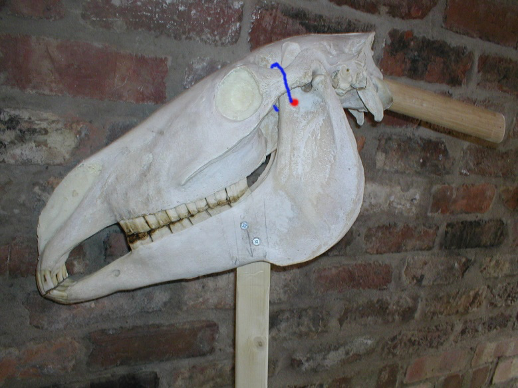
Drill a hole in the lower jaw near the top of the hinge, see red dot, opposite.
When the horse has been decorated you can thread a shoelace or similar through the hole you drilled in the bottom jaw and loop it through the socket in the upper jaw, see blue line, opposite.
You don’t want it so tight that you can’t open and shut the jaws easily.
Fit eyes. You can buy them online from a taxidermy supplier or you can make your own. An easy way is to cut a table tennis ball in half around the seam and pack the inside of the ball with filler.
Fitting ears will improve the look of the head. Make a template out of card to check the size and proportion. The ears need to be flexible yet strong, I have used leather and rubber, both work. Screw them to the skull.
Fill any screw heads that you do not want to show. Apply a white primer coat of paint, this highlights any rough patches which I finish off with car body filler.
I have used gloss paint on most of the heads that I’ve made but used eggshell finish on the last one I made. The gloss gives a dramatic finish, the eggshell, a softer, more naturalistic one. I use white for the blaze and around the eyes, and red inside the mouth. Sometimes I paint the teeth, other times I leave them natural.
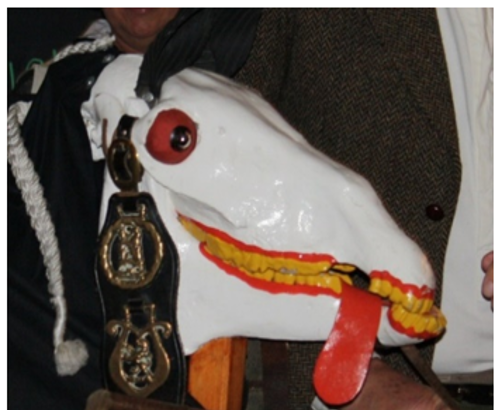
I know of one horse that has a white face and two that have tongues. The choice of decoration is yours.
I screw the blanket to the top jaw, behind the ears but before the handle, this stops it slipping off.
To finish the horse off you need a tail. I bought a real one from an online rocking horse supplier. I have also made them from plaited cotton ribbon and have seen others made from old rope.
The last horse I made was a replica of the one used by the old Alderley Mummers, I fitted it with a bridle because that is what the old gang did, but it is not usual.
Added later in response to a query about bottle-bottom eyes (RS)
I used bottle-bottoms 40 years ago when I made my first horse. The punt in the bottom of the bottle had got shallower over the years and the best I could find were from a particular brand of liqueur. I used to rummage through the bottles chucked out by a local hotel. They were not easy to cut and I broke quite a few before I two that were OK. I seem to remember grinding hem down, not something I would recommend today. The deepest punt nowadays are in sparkling wine bottles but the glass if far too thick.
The first year we went out with the horse it was left leaning against a brick wall. It slid down breaking two front teeth and scraping the glass eye. I repaired the teeth but the eye remained scraped. When I made my second horse I decided that it wasn’t worth the bother of using bottle-bottoms.
Duncan Broomhead
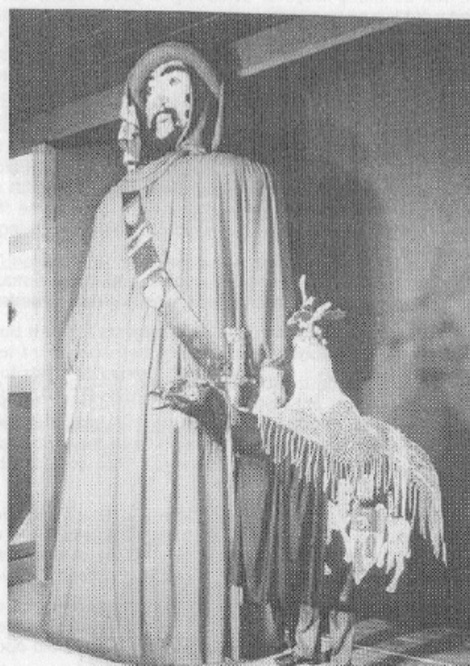
Appendix B: GIANT FIGURES.
There seems to be an interest in the revival of civic giants, and some type of giant might appeal to a Morris side looking for an attendant character with a difference. Obviously the huge one-piece figure of the traditional Civic giant would be impractical, but consider the point in principal . Your giant would have to be: Operated by one man-and therefore, light. Of modest ‘usable’ size. Minimum, manageable windage. Collapsible for packing and storage. If you say ‘Nothing longer than 4’6″ ‘,you can still have a giant about 7′-8′ or even 11′-12’ to the shoulder. The following ideas were inspired by, and based on, a giant Dracula figure seen at the Whitby Folk Festival 1984. This had been made by a most expert Constructor of Giants who was attached to Taffy Thomas’s team. Obviously, there will be many ways of achieving a good result, but the following theoretical example will serve to outline some of the problems and to define areas that need thinking about If I were doing it I should try very hard to obtain the cast-off frame of an old frame-tent that was made from light alloy.
MAIN FRAME. Trapezoidal. Narrowing end at the waist of the operator where there is a rucksack-type fitting. A cross-member at neck height provides a mounting for the shoulder straps, and another at the top forms the giants shoulders. A pair of horizontal fore-and-aft struts just clear the operator’s shoulders, with another pair at the top corners. The ends of these are joined by diagonal stays which should prevent the frame from twisting and give thickness to the body. A light bar joining the fronts of the lower pair of struts should provide a useful fixing point for controls, while something similar at the top would help with the mounting of the head.
HEAD. The general problems are going to involve getting the maximum visual effect and ‘lifelikeness’ with minimum weight and windage and the minimum number of controls. The head is made wide but very shallow. The nose projects forward but there is very little depth behind the face, most being lightweight ‘hair’ I suggest that the head be made to turn, but that the pivot be tilted down to the front so that when the giant is looking straight ahead he is also looking down. The head would be returned to this position by its own weight. As the head turns, it will lift until it is about level at 60 degrees of turn. It is operated by pulling on two strings. I would have the string to turn the head to the left coming to the right hand of the operator and vice-versa. This would enable the figure to reach out in the direction that he is looking.
EYES. These should he made to move up and down. (perhaps with built-on eyelids). They are worked automatically from the rotation of the head. When this is in the neutral, forward, looking-down position, the gaze is at about right-angles to the plane of the face. As the head lifts to the side the eyes look down to keep the angle of gaze about constant relative to the horizontal.
MOUTH. An opening mouth would he nice . I would give him a droopy ‘Astertix’ moustache which would define the sides of the mouth. If its ends diverged, and the lower lip worked behind them, the mouth would seem to be getting wider as it opened. Could open as the head turned.
ARMS. Worked by rods attached to the hands, like some puppets (v. Kermit’) The rods would need to be as light as possible, and as there is negligible loading, strong canes might do. The shoulder joint can be ‘universal’ t.e. two linked rings; but the elbow should have the restriction of the natural joint. The inner ends of the canes should be fastened to the operator’s belt by cords so that the operator can let go altogether if he needs to. Wrist-straps might be useful here. Extra features would be a matter of personal inclination and ingenuity. Possibilities might include: Rotating the operating cane causes the hand to lift and the fingers to spread and/or curl or uncurl. Alternatively this could be linked to rotation at the elbow. More head or eye movement. Flashing eyes or a loudspeaker in the mouth. Etc., etc. • weight is probably the limiting factor.
COVER. This is very important the Whitby Dracula minimised windage by having the material above the operator cut into strips about 3′” wide. This allows the wind to blow through the figure. and it is this development which makes the idea practical. One problem which has to be faced is that of durability. I think that I would look for some really lightweight material that is made in strip form . This would be better than cutting up larger pieces, with problems of splitting and fraying.
Ron Shuttleworth, 41 Morningside, Coventry, CV5 6PD, 024 7667 6721 mumminguk@mail.com. © R K Shuttleworth 1994/2018. All rights reserved. Neither whole nor part of this may be printed. stored in a retrieval systcm or rcproduced as part of any other work, It may, however, be photocopied provided that it is copied in full and that the recipient pays no more than the costs of copying. ISgN 0 9510140 3 X The Illustrious Order of Fools and Beasts https://edwardsce.netfirms.com/Foolsandbeasts/FandBTop.htm